SOAP messages can be sent to external systems using standard workflow with an outbound message action type. Salesforce makes it absurdly easy to setup the workflow and outbound message, and once the outbound message is created in salesforce you can generate a wsdl that can be used to create the webservice that the outbound message will call.
Often times it is advantageous to test the outbound message and see what payload is being delivered before handing the wsdl over to whomever may be creating the webservice that the outbound message will ultimately call. Putreq.com allows you to create a “service” that will consume your outbound message, display the request headers and body, and send salesforce a successful acknowledgment of receipt. This post will walk through the steps to setup the outbound message in salesforce and configure putreq.com to consume and respond to the message.
— A note here…the salesforce outbound message waits for a successful acknowledgement of receipt of the message, without this acknowledgement salesforce will assume the message was not received and continue to retry until it ultimately fails. See Understanding Outbound Messaging for more details.
Also note that up to 100 notifications will be batched together into a single SOAP message – this translates to: if an outbound message is triggered by a bulk operation – say a mass data update – it won’t send separate messages, but rather put them into a single SOAP message. This means that the service that the outbound message is calling should be properly configured to handle multiple “notifications” within a single SOAP message.
PUTSREQ.COM SETUP
We’ll setup a putsreq bucket as the “service” and use that as the Endpoint URL in the salesforce outbound message.
- Navigate to http://putsreq.com
- Select “Create a PutsReq”
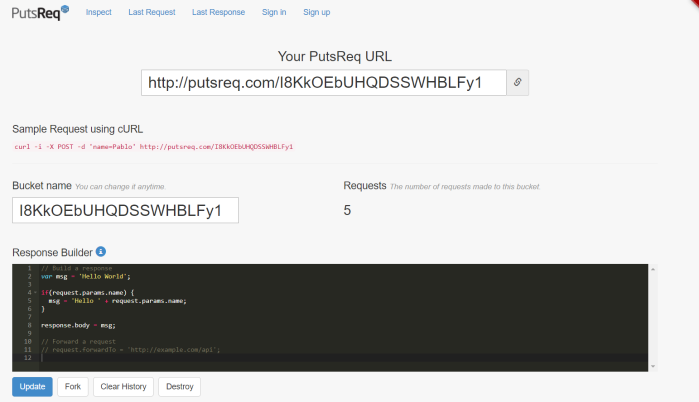
- In the response builder add the SOAP response for a successful acknowledgement. This will be the response back to salesforce indicating that the message was received successfully and for salesforce to not retry the message.
- Select “Update”
- Note the “Your PutsReq URL”, we’ll be using that as the EndPoint URL in the outbound message.
PutsReq Setup:

Response Builder Response:

CONFIGURE THE OUTBOUND MESSAGE
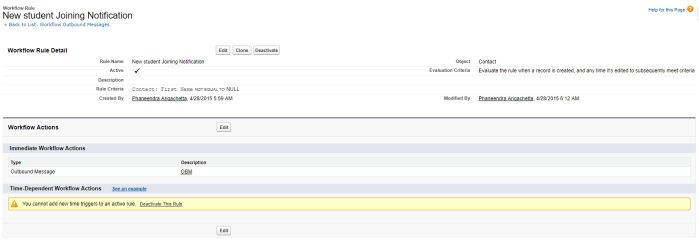
Now that the endpoint is setup, we can create the outbound message in salesforce. For this example I am going to create a simple workflow that fires on contact when the email address changes.
Create the workflow:
- Login in to salesforce and navigate to Setup>Create>Workflows & Approvals > Workflow Rules
- Select “New Rule” and configure the workflow (I created mine to fire on contact when the email changes)
- Don’t forget to activate the workflow when ready.
Once the workflow is created, add a new outbound message workflow action by selecting Add Workflow Action>New Outbound Message
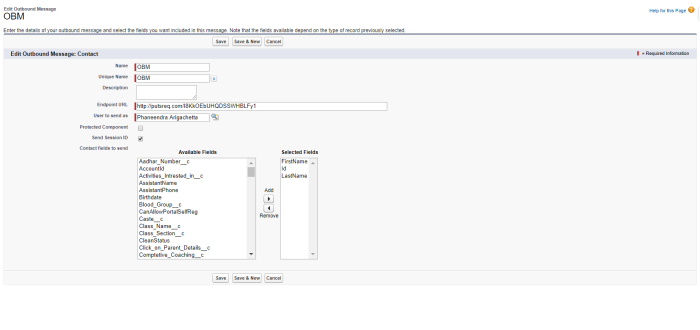
Configure the Outbound Message with the following:
- EndPoint Url: – eg. http://putsreq.com/2W3YCI7ysQjae6IvUpxH
- Add any fields that the outbound message should send in the SOAP Message
The Workflow:

The Outbound Message:

SET UP A REMOTE SITE SETTING
In order for salesforce to make a call to an external endpoint, a remote site setting must be configured.
- Navigate to Setup>Security Controls>Remote Site Settings
- Select “New Remote Site”
- Give it a name
- Remote Site URL: http://putsreq.com
- Disable Protocol Security: Checked – PutsReq is http, not https so this must be checked.
- Active: Checked
- Save
The Remote Site Setting:

TEST IT OUT
PutsReq is setup, the outbound message is setup, and the remote site setting is setup. It’s time to test it out. I’ll navigate to a contact and change the email address. This will trigger the workflow rule and send the outbound message.
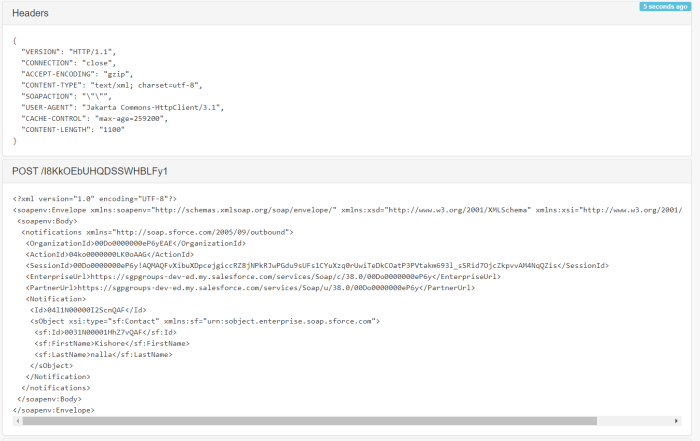
PutsReq Output:
PutsReq will display the request headers, the request body (what salesforce sent), and the response body (what PutsReq sent back to salesforce in response).
Here we can see the message that salesforce sent, in this example only one “notification” node was sent.

Note:
On a bulk update salesforce will send a single outbound message with many nodes (up to 100 notifications in a single message).
